June 01, 2007

What?

Google logo

Send yourself a voicemail message using Google Talk and you'll get it as an MP3 audio file via email. This makes it a great general purpose voice memo service.

Google Talk voice memo service

The ability to record up to 10 minutes of audio and get it as an MP3 via email makes Google Talk's voicemail a useful and flexible tool for recording audio. Sending yourself voicemail gives you several options: listen to the MP3 using Gmail's embedded player, forward it to others (even if they don't use Google Talk), download it, post it to a blog or website, etc.

How?

Send yourself voicemail using Google Talk in 3 easy steps.

Before you begin, you'll need some kind of microphone or headset (I use the Bluetooth headset I bought for my mobile phone) setup as your computer's audio input device. Once that's setup, go to Google Talk's Settings to make sure the right input device is selected. For now, you have to use the desktop version of Google Talk — voicemail is not currently supported in the Gadget version.

  1. Search - Search for yourself in the "Search all contacts" field. (Hey, Google Talk Team: It would be really nice if we could send voicemail to ourselves without having to search first!)
  2. Hover - Once your name comes up, hover over it, and a dialog box will pop up. Click the "Send voicemail" button. (If "Call" is the only button that comes up, use that; it'll ring briefly and indicate that the call was not answered, and you'll see the "Send voicemail" button.)
  3. Record - Wait for the "meep", record your message, and click "End Call". You'll receive the voicemail message via email shortly afterward.

The Google Talk Blog has more information about using voicemail.

Tips & Tricks

  • To find all your voicemail messages, click the phone icon at the bottom of Google Talk, or type label:voicemail in Gmail's search box.
  • Easily record a quick podcast without having to find & setup additional software. (Audacity is a free, open source option for more extensive audio recording.)
  • Enrich email to far-away family & loved ones with the sound of your voice, even if they don't use Google Talk.

Thanks for yet another great free service, Google, and for such a well-designed & useful service, Google Talk Team!

December 21, 2006

What?

When you're drawing a diagram, write the words first. Draw the box or circle around the words after you've finished writing what will go in the container.

Diagramming tip: write the words first

Why?

Writing first ensures the words will fit inside the container, since you'll draw it around what you've already written. You won't get stuck trying to squeeze the words into a space that's too small.

How many times have you seen people draw boxes on a whiteboard, then try to fit words and phrases into them, and have to start writing smaller or erasing the lines to make more room? Writing the words first

  • eliminates the problem of running out of space,
  • results in a nicer looking diagram, and
  • helps you look better while creating it.

Sometimes it's good to be inside the box.

December 06, 2006

What?

Google logo

You can see several of your Google Reader subscriptions at once by putting multiple Google Reader gadgets on your Personalized Homepage. Each gadget can display a different folder or tag in your Reader subscription list.

If you use Google Reader (it's worth serious consideration!) and you're not using the Reader gadget on your Personalized Homepage, you're really missing out. This miniature interface to the full version of Google Reader is extremely useful, with pop-up "bubbles" for quick reading, the ability to switch between your folders & tags (but sadly not individual subscriptions) and smooth scrolling, all without taking you away from your homepage. You can multiply the benefits of using the gadget by putting more than one on a single homepage tab.

Google Homepage Reader Gadget Birds-Eye View

Why?

Look at a single page for a "birds-eye view" of your Google Reader feeds.

  • Scan the latest headlines or read entire articles right from your homepage. You don't need to go to Reader to see your feeds. You can get a quick update on several feeds at a glance, right from your homepage. If you want to read more than a headline, just click on it, and a "bubble" will pop-up and display the entire article. It's lightning fast, and you don't leave the homepage.
  • Syncs with full version of Google Reader. All the Reader gadgets stay in sync with your full version of Reader, so if you read or star something in a Reader gadget, it'll be that way in the full version, and vice versa. The basic feed gadget doesn't do this, since it has nothing to do with Reader.
    • This is a key feature, and it's worth highlighting: I can use the full version of Reader, Reader gadgets, or Reader Mobile to read feeds from almost anywhere, and state is always maintained. That means there's no downside to any of the methods, and it makes reading feeds easy and efficient.
  • Manage just one set of subscriptions. You've long been able to put multiple basic feed gadgets on your homepage, but if you do that and use Reader as your primary feed reader, you've got two sets of subscriptions to deal with. The Reader gadget uses the subscriptions you're already managing in Reader.

How?

Add a Google Reader gadget, press the Back button, add another, repeat. It's that simple.

Tip: Create a separate tab. If you plan to put multiple Reader gadgets on your homepage, you may want to start by making a separate homepage tab for them. Once you've done that, make sure you've got that tab selected, since gadgets get added to the current tab.

To add multiple Google Reader gadgets to your Google Personalized Homepage, follow these steps:

  1. Find it. Find the Google Reader gadget in the Homepage Content Directory. (You can either click on the link here, or go to your homepage, click on "Add stuff", and search for "reader").
  2. Add it. Click the "Add it now" button.
    • This will take you back to the Homepage Content Directory, and you'll see a "Back to homepage" link at the top left of the page. Do not click that link yet.
    • If you are not redirected to the Homepage Content Directory, you'll probably see the "Add it now" button disappear, and in its place, a check mark next to "Added". If you see that, you should be able to reload the page, and skip the next step.
  3. Go back. Use your web browser's Back button to go back to the previous page.
  4. Add it again. Click the "Add it now" button again.
  5. Repeat. Repeat the two steps above until you've added as many Reader gadgets as you want.
  6. End. After you've added your last one, click on the "Back to homepage" link.

Tips & Tricks

  • Each Reader gadget is an individual. You may find that you want different behavior for different feeds, depending on what they contain or how often they update. Try configuring gadgets to display various numbers of items, or changing whether or not they display items you've read.
  • See what you've starred. I star articles to highlight them for further reading or action. Putting my Starred Items on my "BirdsEyeView" tab ensures I don't forget about them, and makes them quick & easy to access.
  • You can scroll within each gadget. If you want to see more than the max of 10 items per gadget, you don't have to open Reader, you can just click on the up/down arrows, or hover over the gadget and use the scroll wheel on your mouse.

Feedback and suggestions to the developers

I've become a strong advocate of Google's Personalized Homepage, and an was instant convert to Reader as of it's redesign. I'm really impressed that the two work together so well, and the developers of both should be proud.

To the developers of Reader and the Reader gadget, thanks for such a nicely executed, well thought-out tool (and service)! Please consider these suggestions:

  • Enable us to choose individual subscriptions to display in the gadget. Currently, the gadget allows us to choose a folder or tag to display, but not individual feeds. (Each "folder" in Reader is a mix of the feeds it contains.) I know "river of news" style feed reading is all the rage, and it certainly has its benefits (I've advocated feedmixing myself). That said, it would be nice to be able to specify a particular feed to display in a gadget, just as we can do in the mobile version of Reader.
  • I'd like the option to auto-hide the bubble if I move the mouse away from it. That would mean one less mouse click, and potentially faster navigation. (Note the word "option"!)

Credit

I was inspired to try putting multiple Reader gadgets on my homepage by thinking about:

  • Dave Barnard's comment that he'd like to be able to customize what shows up on PopUrls.
  • Marshal Kirkpatrick's recent comments on using a startpage as a component of his feed-reading in his recent Open Sourcing My TechCrunch Workflow post. Marshall writes:
    Almost anything can be read by RSS feed, so you can display almost anything on a startpage. These services fulfill a very specific function for a person working on the web - they provide a one click view of updates from various sources, inside the browser and distinct from the more heavy duty environment of a feed reader.
    Exactly!

October 20, 2006

What?

Microsoft Windows logo

Collapse Windows Task Manager into a desktop widget that's between full size and the minimized system tray icon.

In two clicks, you can put Task Manager in "widget mode" and see useful information at-a-glance, without taking up a lot of room.

Why?

Widget mode is much smaller than normal, but still large enough to display different kinds of useful information.

Windows Task Manager is a great way to see what your computer is doing, but sometimes it takes up too much space. Minimizing it to the system tray moves it nicely out of the way, but it

  • displays only the current processor load,
  • doesn't show processor load history, and
  • doesn't display any other information.

How?

Double-click on the inner border of any Task Manager tab to put it in "widget mode". Double-click again to restore Task Manager to its normal state.

SCREENSHOT: Windows task manager collapse to widget

Tips & Tricks

  • Click and hold on the border to drag the widget around your desktop.
  • This works for any tab in Task Manager, so you can use it to keep an eye on all kinds of information, like network utilization, your process list (to see what's hogging all the memory or processor), etc.
  • Find a creative way to use Task Manager in widget mode; look in the View menu in each tab to choose optional information to display. Some things (e.g. I/O reads & writes, network throughput, etc.) might be really useful to see at-a-glance, depending on what you're doing.

Disclaimer: I stumbled on this by accident. In fact, I'll come clean and admit that I did this months ago on one of my computers, and figured there was just something wrong with Task Manager. :) It wasn't until I accidentally did it again today and started to experiment with resizing it that I realized it might be a display mode!

Update: I didn't think by any means that I was the first to "discover" this; I mainly wrote it up because I'd been too lazy to look into the "problem" before, and thought I'd share it with others who may have done the same. My wife encouraged me to search for more information; it turns out this is called Tiny Footprint mode. (I think "widget mode" is cooler!)

October 04, 2006

What?

Google logo

Put individual, "standalone" Google gadgets directly on your Windows desktop using built-in Active Desktop. No web server required.

Google just opened up their inventory of gadgets that were previously available only on your Google Personalized Homepage. Now you can put Google gadgets on any web page, which makes it possible to use them in a wider variety of places and ways than before. One example is to put Google gadgets right on your Windows desktop. This is easy to do using Windows' built-in Active Desktop feature.

SCREENSHOT: Google gadget on Windows desktop

Google said they made the gadgets available for "webpage owners everywhere to browse and select gadgets for their own pages". That's great, but in fact, you don't have to be a webpage owner; you can use gadgets on your Windows desktop without a web server.

Why?

This is an easy way to use gadgets in "standalone" mode, without hosting them on a web server, browsing to a web page, or installing additional software.

The concept of gadgets/widgets on the desktop isn't new, but this variation allows you to:

  • Use gadgets without a web server. You can store the code for a gadget right on your computer.
  • Use gadgets without manually opening a browser and visiting a web page. Technically, you are using a web browser -- Internet Explorer -- when you use Active Desktop, but it's embedded in the desktop, and always visible.
  • Have a consistent set of gadgets. Now you can use the same gadgets on your desktop as you use on your Google homepage. (NOTE: Not all gadgets available for Google Homepage are available for webpage use.)
  • Use gadgets without installing any additional software. Other widget/gadget frameworks that use an installed "engine" -- such as Yahoo Widgets/Konfabulator -- might provide richer functionality and look & feel in some cases, but there's a certain appeal to avoiding yet another piece of software to install and update.

How?

Add Google gadgets to your Windows Active Desktop just like any other webpage.

  1. Find a gadget in the directory of Google gadgets for your webpage and click the "Add to your webpage" button to configure it.
  2. Click the "Get the Code" button, and copy the HTML.
  3. Create a new HTML document (e.g. "gadget-name.html") on your computer or web server, paste in the code for the gadget, and save it.
  4. Right-click on your Windows desktop and select Properties.
  5. Click on the Desktop tab, and the Customize Desktop button.
  6. Click on the Web tab, and the New button.
  7. Click the Browse button, and find & select the HTML document you created to hold your gadget code. If you saved it on a web server, enter its URL in the Location field.
  8. Click OK 3 times, and you should see the gadget on your Desktop!

Tips & Tricks

  • Repeat the steps above to add more gadgets to your desktop.
  • Finishing touch: By default, there's a white background surrounding the gadget (even larger than in the screenshot above). You can add
    <body bgcolor="your_desktop_background_color">
    above your gadget code to make it blend seamlessly with your desktop background color.

Beyond Windows?

Does this work on other platforms? If so, blog it, and link to this article!

I haven't looked at Linux or MacOS in a long time, so I'm not sure if either (or any other platform) has an equivalent to Windows' Active Desktop. If you get this to work on something other than Windows, please blog about it and link to this article. I've disabled comments due to spam, but one of the search engines will pick up the link, and I'll see it & link back.

July 21, 2006

What?

Firefox logo

Change the color of the active tab in Firefox to improve its visibility.


By default, the active tab in Firefox is not very visible, and it becomes less so the more tabs you open in a single browser window.

Why?

Changing the color of the active tab makes it easy to see at a glance.

Firefox's tabbed browsing makes it easy to manage having several websites open at once, but with multiple tabs open, it doesn't take long to lose sight of the active tab.  Spending time looking for the active tab reduces the benefit of using multiple tabs. Changing the active tab's color solves the problem by making it stand out in the crowd.

Before

Firefox active tab default

After

Firefox active tab more visible

How?

Make a quick change to your userChrome.css file, then restart Firefox

Edit your "userChrome.css" file and add:
/* Change color of ACTIVE tab */
tab
{
    -moz-appearance: none !important;
}
tab[selected="true"]
{
    background-color: rgb(255, 106, 106) !important;
    color: black !important;
}
/* Change color of normal tabs */
tab:not([selected="true"])
{
    background-color: rgb( 70, 130, 180) !important;
    color: white !important;
}

The colors in the example code above will make your tabs the same colors as mine in the screenshot above; you can use any colors you like.

Note:  You must restart Firefox for this change to take effect.

Reference

July 08, 2006

What?

Firefox logo

Use the Firefox address bar instead of the built-in search box to search any website or search engine.


By default, if you enter a search query in Firefox's address bar, the browser will perform a Google "I'm Feeling Lucky" search.  You can change this so it will perform a normal search using Google or any other search engine you want.

Firefox search from address bar

Why?

Fewer text input areas = simpler & faster searching

It's much more efficient to use a single input field for all text entry, rather than one for addresses and another for search. This eliminates the need to think about which one to use based on what you want to do, which means one less keyboard shortcut to memorize, and one less decision to make.

Computers can do a pretty good job of figuring out what to do based on what you enter, so let the browser work for you, and get in the habit of always using the same keyboard shortcut to jump to the address bar, whether you're navigating or searching.  After you try it for a while, you'll wonder why anyone would want two text input areas. No, it's not perfect, but it works great 99% of the time.

One less thing on the toolbar

Now you can free up space on the toolbar by removing Firefox's built-in search box (right-click on the toolbar, select Customize, and drag the search box off the toolbar).  If you were using it to access other search engines, try setting up Quick Searches for those instead.  Quick Searches use the address bar, and let you quickly perform a search on any website or search engine.

How?

Make a quick change to your user.js file, then restart Firefox

Edit your "user.js" file, and add:

// Change to normal Google search:
user_pref("keyword.URL", "http://www.google.com/search?btnG=Google+Search&q=");

You can substitute the URL with the appropriate syntax for whatever search engine you want to use.

You may have heard about making changes like this by typing "about:config" in the address bar, but as far as I can tell, those changes apply only to the current browser session, and don't persist when you restart.

Note: You must restart Firefox for this change to take effect.

Reference

July 04, 2006

What?

Firefox logo 

Instantly find and jump to any link or text in a web page just by typing into your Firefox browser window.  No keyboard shortcut required.


As part of the Accessibility functionality, the Mozilla developers made it possible to "find as you type" without using a keyboard shortcut.  You can set this up by enabling "Begin finding when you begin typing" in Firefox, which takes less than 10 seconds. 

Why?

This makes finding anything on a web page almost effortless, and eliminates the need to do something (e.g. use a keyboard shortcut) to tell the browser you want to start searching.

Why go through extra steps when you want to find something on a web page?  Once you try this, you'll see it's really fast & convenient to be able to just start typing when you think of something you want to find on a web page.

Great for finding a tag in a tag cloud

This is a generally useful trick, but it's also a perfect solution for finding tags in a busy tag cloud, since you often know the name of the tag you want, but have to find it among many others.

I'm discussing this in the context of  del.icio.us tag clouds since mine is pretty large, and that's what inspired me to start using this technique.  One of the strengths of del.icio.us is that it facilitates using a lot of tags.  Unfortunately, if you do so, it soon becomes a challenge to visually locate and click on the one you want.  "Find as you type" solves this problem.

SCREENSHOT: Firefox find as you type in tagcloud

Screencast demo: See it in action

The best way to see the benefit of this is to try it, but you can get a sense of it by watching the screencast I made to demonstrate how this works:

SCREENSHOT: Firefox find as you type tagcloud demo 

(This is my first screencast, and it was very easy to create using Wink, so I want to thank the developers for this great free software!)

How?

Enable "Begin finding when you begin typing" in 2 easy steps:

  1. Go to the menu and navigate to: Tools - Options - Advanced - General
  2. Select "Begin finding when you begin typing"
    • SCREENSHOT: Firefox Begin finding when you begin typing


To use it:

  1. Go to any web page and start typing a word you see on the page.
  2. When the link you want is selected, press "Enter" to open it.

Tips & Tricks

  • Try this on any web page that has text and links.
  • Try this with your tag cloud on your del.icio.us start page.
    • If you don't use del.icio.us, or don't have enough tags to warrant searching, try it with the main del.icio.us tag cloud that I used in the screencast.
  • If your cursor ends up on a word in the link title or notes that you don't want, just press "F3" to find the next instance.
  • I haven't seen an obvious way to do the equivalent of this in Internet Explorer; if you know how, please comment.

Reference

  • Mozilla Documentation / Keyboard Feature: Find as You Type
    • A bit out-dated, and this feature is now implemented via dialog boxes, but the documentation provides some tweaks some may find useful.

April 19, 2006

What?

You can embed an OPML browser like Grazr or Optimal in your Google Personalized home page using Bitty, an embeddable mini web browser.

SCREENSHOT: Grazr and Optimal in Google Personalized Home


Grazr and Optimal are OPML browsers designed to be embedded in blog sidebars & web pages.  Usually, embedding one of these in a page requires that you have the ability to edit the page's source or template.  This isn't an option with your Google Personalized home page, but you can circumvent the problem by adding Bitty -- an embeddable web browser  -- as a content  module to your Google page, and use that as a "wrapper" to display your Grazr or Optimal browser.

Bitty can display OPML too, and may be a good choice depending on your needs.  Grazr and Optimal are a bit more purpose-built for the task of displaying and navigating OPML, whereas Bitty is a good general-purpose embeddable web browser that can also display OPML.

Update: 2006.04.25 - I tested this with my Windows Live home page, and it works, but doesn't seem to pass through the parameters I included in the URL for Grazr (e.g. size, run solo). 

Update: 2006.07.03 - Grazr blog: Tom Morris (who just joined the Grazr team) has hacked Grazr into a Google home-pages widget so you don't need to use Bitty Browser as a wrapper for Grazr. 


Why?

Embedding an OPML browser in your Google Personalized home page extends the capability of the page by enabling you to browse & graze content without having to navigate away from the page.

This is a good way to aggregate multiple instances of Grazr and/or Optimal that you use on a regular basis, or to ensure you always have an OPML browser handy any time you're looking at your Google home page.  I won't enumerate the potential uses for this capability here, (but free free to share your ideas in the comments) but consider the basic idea that you can setup a collection of several easily-navigable, miniature content sites, all of which are accessible from a single place

Despite the bad rap they often get, I think there's a lot of potential value in personalized home pages, especially with the addition of customizable modules, and new tools & capabilities like these embeddable web and OPML browsers.  More on this another time...

Update: 2006.04.24 - Apparently, I'm not the only one who likes the idea of using Bitty in the Google home page!  Steve Rubel is using it to make his personal mobile wiki always available.


How? 

The general idea

Add a Bitty Browser module to your Google home page, and within Bitty, load an instance of Grazr or Optimal that points at the content you want to display. 


First, consider how you'll use it 

There are two approaches to using embedded OPML browsers on your Google page.  Each has its merits, and they are not mutually exclusive; in fact, you may want to use a combination of the two.  It's important to think about which approach you want to use before you begin, so you can configure the OPML browser in the appropriate mode:

  • Approach 1: Create multiple instances, each to display specific content
    • Description: Display more than one OPML browser, each with its own purpose or topic.
    • OPML browser mode: When you point the OPML browser at the content you want it to display, select "Run Solo" (Grazr) or "Standalone" (Optimal) to get a clean page with just the browser and no controls.
  • Approach 2: Create a general-purpose instance
    • Description: Use a single OPML browser to load different content at different times.
    • OPML browser mode: Do not click the checkbox next to "Run Solo" or "Standalone", and you'll be able to enter the addresses of different OPML files (and feeds, with Grazr) you want to view.

Grazr and Optimal have different strengths for different uses, so experiment to determine which works best for you using either approach.


5 steps to embed an OPML browser in your Google home page:

  1. Use Grazr or Optimal to "skin" an OPML file, and copy the address of the resulting page.
    • Here's where you would select "Run Solo" (Grazr) or "Standalone" (Optimal), depending on the approach you chose above.
  2. Go to the Bitty Browser configuration page and select "contents/home page" from the "Customize" section:
    • Bitty Browser config 01
  3. Enter the address of the skinned OPML file you created in Step 1:
    • Bitty Browser config 02
  4. In the "Add this Bitty Browser:" section, select Google:
    • Bitty Browser config 03
  5. Google will ask you to Confirm that you want to add Bitty to your Personalized Home page
    • Bitty browser config 04

After you add Bitty to your Google home page, you can easily change it's Home Page (the address of the page it initially displays) using the "Edit" link on the module:

Bitty browser config 05

This is an easy way to switch between the two approaches discussed above, and experiment with loading different content n the OPML browser without having to re-add the Bitty module to Google.

Of course, you can use Bitty to display much more than an OPML browser on your Google home page, it just happens to be a perfect solution for this problem.  I really appreciate that the developers at Google, Bitty, Grazr, and Optimal are providing these tools & services, especially that they're doing so for free!

April 06, 2006

What?

Screenshots are a valuable tool for any level of computer user, but many people think creating them is difficult, or requires special software.  In fact, they're easy for anyone with basic computer skills to create, using software that comes standard on every Windows computer.

The tools:  (Alt + PrtScr) + Microsoft Paint


windows screenshot tools 

Unfortunately, many people don't realize how easy it is to take screenshots, and end up using the wrong tools that produce larger than necessary images in formats that aren't suited for email and the web.  Fancy screen capture software does have its place, but for basic screenshots, it's overkill.  Using the right format guarantees everyone will be able to see your screenshot right in their email programs and web browsers.

Once you memorize how to do it, you can create a screenshot and add it to an email or blog article in less than a minute.


Why? 

Screenshots provide an easy way to share or keep a record of what's visible on your computer at a particular instant.  They improve communication by adding a visual component; as they say, a picture is worth...

Once you see how fast and easy it is to take a screenshot, you'll find it often comes in handy for a variety of uses, such as:

  • Creating clear how-to and help documentation with visual examples
  • Showing someone exactly what you're looking at on a computer
  • Quick-saving something when you don't need or want it in editable form (e.g. receipts from online purchases, airline itineraries, maps)
  • Sharing desktop & browser configuration tips
  • Showing off your high score on web-based video games


How?

Take a screenshot in 5 easy steps:

This looks long, because I'm including a lot of detail, but it really is just the quick five steps in bold below.

  1. Select the window you want to capture
  2. Press "Alt+PrtScr"  to take the screenshot
    • (Press and hold the "Alt" key, then press the "PrtScr" key.)
      • This key combination should be easy to remember, since "PrtScr" stands for "print screen".
    • This copies the image of the selected window to the clipboard.
    • "Prt Scr" alone will take a shot of the entire desktop
  3.  Open Paint
    • Shortcut: Press the "Start" key + R and type "mspaint":
      • screenshot of run dialog with mspaint
    • Paint isn't fancy, but it's on every Windows computer, takes no time to load, and can handle basic tasks like highlighting and adding comments.
  4. Paste the screenshot
    • If you don't want the entire window:
      • Select the part you want (Paint defaults to the Selection tool after you paste an image.  Just press the "Esc" key to cancel the selection of the entire image; you'll see the dotted border disappear.)
      • Copy it
      • Use Ctrl+z to undo the paste of the initial screenshot
      • Paste your selection
  5. Save the file
    • You'll be prompted to enter a filename and specify the file type:
      • screenshot save as PNG example
    • Saving to your Desktop makes it quick and easy to find, for instant emailing or posting on a blog, though I recommend filing it somewhere meaningful after using it.
    • I've standardized on the PNG format for screenshots; it doesn't degrade image quality and produces a small file size.  See "When and how to use internet image formats" for good information on this topic.

April 04, 2006

 What?delicious logo

The "for:" tag enables del.icio.us users to send links to one another.  Subscribing to your "links for you" feed from your del.icio.us account ensures that you automatically see links people send to you this way.

 
When someone sends you a link using the "for:" tag, it shows up on your "links for you" page in your del.icio.us account.  (The page used to be called "for", but was recently changed to more clearly communicate its function.)

delicious links for you


Why? 

The "for:" tag is a great way to send links.  If you aren't monitoring your "links for you", you could be missing things people are sending to you.

I don't know how commonly people use the "for:" tag -- and its inherent privacy prevents us from looking at others' accounts to find out -- but I suspect it's underused.  Even if this isn't popular now, it may become reasonable to expect people to check their link inbox nearly as often as their email inbox.  This could evolve into the equivalent of an email inbox.  Note that while "links for you" is effectively an inbox, it's distinct from the del.icio.us concept of the "inbox".

I make this speculation conscious of the fact that this way of sharing is limited to del.icio.us users.  Remember, all Yahoo! users will likely soon be able to use del.icio.us with their Yahoo! account, just like any other Yahoo! service.  That plus the non-Yahoo! del.icio.us userbase is a substantial network for sharing!

People will increasingly recognize these and other benefits of sharing links this way:

  • It's the right system for managing links - Email can be a good way to share links with specific individuals, but if your recipient is a del.icio.us user too, using the "for:" tag gives you both the benefits of the service you're already using; one designed to manage links.
    • You can see what tags the sender associated with the links, so they're in context
    • It's easy to copy them to your own account.
    • It produces a feed, which is arguably a more appropriate and efficient (in most cases) way to share links than email.
  • Targeted sharing reduces information overload - The "for:" tag enables you to create individualized feeds for sending links to specific people.
    • People are likely to pay more attention to links you tag explicitly for them.
    • Subscribing to the feed of just those links might be more appealing than subscribing to your entire shared links feed, since it would likely be lower volume.
  • Adequate privacy - Most everything about the "for:" tag is invisible to anyone but you and the recipient.
    • Others can't see the fact that you tagged something "for:username".  NOTE: Doing this does not make the link private; only the fact that you tagged it "for:" someone is hidden.
    • The feed is "private" but not authenticated.  It's just got a long string attached to it, presumably to make it unique and somewhat obfuscated.
    • I had no problem subscribing to mine with Bloglines.
    • I think the degree of security it provides is totally reasonable, and people should know better than to expect serious privacy in feeds and social bookmarking services at this point anyway.

How? 

It takes very little effort to monitor your "links for you":

  • Copy the feed address into your favorite feed reader, and you're done!

Speaking of "how", it's a good idea to think about how you use the ability to send links to other del.icio.us users; remember, people can choose to be antisocial toward individual users!

April 02, 2006

What?

Grazr logo

Grazr is a good front-end for OPML files ("live outlines") and feeds.  When you publish or share an OPML file, offer a way to see what it contains by using Grazr as a service to "skin" the content.

The typical way I've seen people using Grazr is to embed it into a blog sidebar, but it can also be used as a service, to skin any OPML file or feed you want to publish or share.  This means you don't have to embed it to get a lot of value from using it!

I'm going to focus on outlines (OPML files) here, but as Adam Green points out, Grazr works directly on RSS too, making it a great way to share feeds as well.  The majority of feeds people publish and share are generated from blogs, so people already see them in human-readable form.  OPML files don't have an equivalent; they're typically published "raw", with no formatting.

Why?

This is a great way to share outlines and feeds so they're immediately useful to the reader.  Grazr makes it easy to quickly preview the content without having to commit to subscription.  

People are starting to publish OPML files, which is great, but:

  • Many (most?) people aren't familiar enough with this technology to see the benefit of it.
  • Most of the OPML files I've seen recently don't include a useful way to see what they contain.
    • Sure, the reader can click and see them as rendered by a web browser, but this is about as valuable to most people as looking at HTML -- fine for those who are learning or know it, but not very useful otherwise.
  • Seeing OPML rendered in a human-readable form makes it much more useful.

John Palfrey recently wrote about his a-ha moment in "Getting OPML", and provided the example of toptensources.com, which publishes OPML content.  Check out how their Science News section looks as a raw OPML file, vs. the same OPML content, skinned by Grazr:

Raw OPML vs Grazr skinned 

How?

One of the nice things about Grazr is that the developer made it easy to use as a service — something that differentiates it from some of the other current OPML browsers —  by providing a simple way to plug in the address of a feed or live outline (OPML file) and see it in a Grazr "panel":

SCREENSHOT: Grazr as service

Method 1: Copy, Paste, Publish

  1. Copy the URL of an outline or feed.
  2. Go to the "Create a Grazr" page (hint: click the bottom of any Grazr), paste in the URL, and click the "Display this URL" button.  (You can configure your Grazr's font, viewing mode, etc. at this point.)
  3. To publish a link to the Grazr-skinned version of the outline or feed,
    1. Find the "Save your Grazr to a Web Page" section, and click the "Type of Web page" drop-down list.
    2. Select "Generic Web Page".
    3. Find the "Grazr URL" section, click the URL to select it, then copy and paste it.

Method 2: Create a link by hand 

  • URL syntax: http://grazr.com/gzpanel.html?file=http://address-of-your-feed-or-OPML-file

Using either method, you can customize the size of the panel.


Now What? 

  • Publish the Grazr-skinned link alongside the raw OPML file - When you publish an OPML file on your blog or website, add a link next to it that says something like "Graze It!", with a link to the Grazr-skinned version alongside the raw OPML.  Don't remove the link to the raw OPML; that's still useful as a separate link.
  • Here's a "Graze It!" button - I made a button that I plan to use for publishing my outlines.  Note that this button is not Grazr-specific.  Rather, it's specific to the concept of grazing.  For grazing, I happen to like Grazr most among the current OPML browsers I've seen (though others are useful too, depending on what you want to do), but this idea could apply to any that can be used as a service and allow users to link to a rendered version of an OPML file.  You're welcome to copy this button and use it on your own site (I'd prefer you do that vs. linking to my copy):

    Graze It button


    Update: 2006.09.19 - The Grazr team developed their own, Grazr-specific button:

    Grazr button 

  • Tag & share it - To share an OPML file, use your favorite social bookmarking service to tag & share the Grazr-skinned version.  I've created a "grazr-skinned" tag so I can easily find these links.

What the heck is Grazr? 

Grazr is an outline browser that you can use to view OPML files, and graze feeds.  It's designed to be embedded in blog sidebars & web pages, but can also be used in standalone mode as a service, to provide a front-end or skin for OPML files and feeds.  You can read more about Grazr in the FAQ.  Marshall Kirkpatrick posted a list of various ways to use grazr.


Is Grazr meant to be used as a service?  Yes!

I don't know if the developer of Grazr meant for the "Try Grazr" interface to be used as a service.  You can see from the URL that the sandbox is under "/api", but it's possible he intended for it to simply be a place to preview it so you can choose whether or not to embed it in your own page or blog sidebar.  I hope he'll comment and say it's ok to use it this way, because it's a great tool, but also a valuable service! 

Update: 2006.04.02 

Mike, the developer of Grazr, responded and said yes, this fits with his approach in developing the tool, which "involves allowing people to discover new and interesting uses for Grazr".  Thanks, Mike; your attitude will continue to encourage a lot of innovation.  And yes, please do feel free to use the button on the Grazr site!

The thing is, plugging an address into a form is easy, and that's all it takes to use Grazr to skin an OPML file or feed.  This is much easier than embedding it in a blog sidebar or webpage, and enables people who don't have that option to benefit from Grazr. 

In addition to making it easy to share OPML files, this is a great approach for people who want to experiment with creating OPML files.  When I first heard about Grazr, I went through the work to embed it into a web page, then point it at different OPML files I was learning to write.  I'd have saved a lot of time & effort by just using Grazr as a service.


This also works with other outline browsers

As I mentioned above, you can also do the equivalent of what I described with other outline browsers that can be used as a service.  Bitty Browser and Optimal, are two other very useful outline browsers that can do this.   I'll leave the details as an exercise for the reader.

March 12, 2006


You can type delicious.com to get to del.icio.us!


Every time I tell someone about del.icio.us -- one of my top 5 online tools -- they complain about how hard it is to correctly type the address.  It's certainly an innovative name, but it would be hard to call it "catchy" since it's so tough to remember where to put the dots. 

Today my wife asked, "So how do I get to del.icio.us again?"  When I told her how to type it, she added her complaint to the list, and I agree; having to remember precisely how to type it is a deterrent.  We thought to try delicious.com, and it worked!

It's no surprise they'd make this work; they've done an incredible job of imagining ways to use the service, and making del.icio.us flexible enough to accomodate & inspire its users' creativity.  Thanks, del.icio.us Team, for providing an easy way to get to your excellent service! 

March 11, 2006

A feedmix is a "metafeed" made by combining individual feeds into one:

Metafeed Diagram

  • Feedmixes are to feeds as feed readers are to blogs (and other syndicated content).  By collapsing and reducing the number of information flows we manage, feedmixes can dramatically improve the efficiency with which we consume and distribute information.
  • You don't need to read related feeds one at a time any more than you needed to visit individual sites and blogs.   You probably read more than one feed in areas like Finance, Music, Productivity, Business, Friends, etc.   Wouldn't it be convenient to read all your friends' blogs in a single feed?  Do video clips from Google Video or YouTube really need separate feeds?  Why not read about the latest toys from Engadget and Gizmodo in a "Gadgets" feed?  A good feed mixing service will include the source of each item in the feed, so you don't lose that information by mixing.
  • Feedmixing makes it easy to corral "loosely coupled" content, focus it, and redistribute it as an attention stream.   People tag content on blogs, news sites, social bookmarking sites, wikis, search engines, video & photography blogs, etc.  Using common tags makes it possible find all that related content, even though it exists in totally different systems.  This is considered "loosely coupled" content, and it can be used by an individual, or a loosely coupled community.  Feedmixing is a tool for bringing together and redistributing content you choose from several different sites.

(I originally wrote this "elevator pitch" as an update to my article about feedmixes.)


Some of my feedmixes

Not all feeds are ideal for mixing, and there are good reasons you might not want to mix some feeds, even if they're related.  Here are some general examples of feedmixes I've made for myself, with explanations of why I think they're good candidates for mixing:

  • From Friends - A single feed of my friends' various content feeds becomes valuable as more friends start producing more and more feeds:
    • Photos on Flickr - Flickr conveniently mixes all my contacts' photos into a single feed, so in this case I'm actually adding a "pre-mixed" feed to my feedmix.  The fact that all my friends don't use Flickr isn't a problem, since I can add any feed-enabled photosharing site to my mix.
    • Blogs
    • Music playlists
    • Links tagged for me in del.icio.us

I may use this mix to blend a broader "People I Know" mix.  As more people start using feeds, we'll need tools to filter and manage all this content, which will grow in volume as feeds catch on as a way to share information.  It may take a while, but the usage explosion that happened with email and static web content will soon happen with feeds and tagging.
  • References to Me - Blog search engines like Technorati and Google Blog Search offer feeds of blog search results.  These "search feeds" scan for links to my blog, telling me when and where people link to my blog.  There's no reason I need to have more than one feed for these alerts, though it makes sense to use more than one engine in this relatively new area of blog search.
  • Finance - Bankrate publishes several related feeds I want, but I don't need to read them separately, and I can add financial feeds from other sites too:
    • Mortgage news
    • Market trends
    • Savings and investing advice
    • General financial news, analysis, & reports
These are feedmixes I've made for my own use - for ideas on using feedmixes to share and redistribute information, read Marshall Kirkpatrick's excellent article about attention streams.  Leave a comment if you have other ideas for how mixes could be used!

How to make and use a feedmix - 3 quick & easy steps

  1. Mix - Choose a feedmixing service, (some don't even require you to sign up) then copy the addresses of the feeds you want to mix from your feed reader: Select a feed, right-click on its address & select "Copy link location...", and paste it into the mix form.
    • I like Feedblendr so far.  The site has a cool tip; to add to a "blend" of feeds, just put in the address an existing blend, and add the new addess(es).
    • Update: 2007.02 - For really advanced (but easy to use) feedmixing, try the new Yahoo! Pipes.
  2. Burn - FeedBurner is a good "front-end" for a feedmix (as well as individual feeds) that provides several useful benefits, including:
    • Easy to feed address - many feed mixing services just give you a non-descriptive serial number.
    • Feed address stays the same - even if you update your mix and it's address changes, or you change feedmixing services.
    • Several free tools for managing your feed - statistics, "browser-friendliness", routing feeds to email, etc.
    • Insert useful content - You can include a "Post to del.icio.us" link in each feed item, so they're easy to bookmark & share.
    • And more - Take a look at this guide to How and Why To Use FeedBurner; it convinced me!
  3. Subscribe - Add your new feedmix to your feed reader, delete your subscriptions to the individual feeds, and enjoy fewer feeds!
    • It might be interesting to keep an eye on a few individual feeds for a while after including them in a mix, to see what delay (if any) FeedBurner introduces.  I  recommend against using feeds for time-sensitive information -- that's not the point of feeds -- so this is just for academic curiosity.

March 07, 2006

What? 

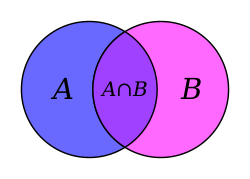
del.icio.us allows you to create tag intersections.  A tag intersection is the list of items tagged with both A and B.  You can use tag intersections to see items that share common tags.

Example: http://del.icio.us/jameselee/cool+video displays all the bookmarks I've tagged both "cool" and "video".  Anything tagged "video", but not "cool", won't show up in the intersection.

This is Wikipedia's example diagram of an intersection in this context:

Intersection Venn Diagram 

Tag intersections are a type of what I call a "tagset", just as in mathematics, an intersection is a type of set.


Why?

Tag intersections let you filter information to create specific views and see relationships. 

  • Create useful lists -  of "movies+toWatch", "photography+tips", "solutions+didWork", "books+toRead", "places+toVisit", "places+didVisit", "restaurants+toTry", etc.
  • Create topic-specific feeds - People can create and subscribe to specific (RSS) feeds of your tag intersections "movies+didLike", "restaurants+recommendations", "computer+tips", etc.  You can do this with any del.icio.us tags; your own, others', all.  This is a good way to follow what people are bookmarking on specific topics.

You can use tag intersections to filter your own tags:  http://del.icio.us/jameselee/ideas+tagging or all tags in del.icio.us  http://del.icio.us/tag/ideas+tagging.  (Note that some del.icio.us-wide tag intersections, especially for popular tags such as "cool" and "video" may cause del.icio.us to return a blank page, possibly due to the load required to filter on so many results.)

Some guidance on using tags

Use many single-word tags instead of one multi-word tag.  Tag intersections enable you to narrow your focus when you want to, so you can use more general single-word tags (and most likely end up with fewer overall tags).  The value of intersections increases as you use more tags to describe your bookmarks, something del.icio.us makes it really easy to do.

Compare the 2 tags, "softwaretools" and "hardwaretools" vs. the 4 tags, "software tools" and "hardware tools".  The former uses fewer tags, but they are unnecessarily specific.  The latter case uses more tags, but each can apply to a wider variety of bookmarks.  This approach gives you the option of looking at everything tagged "tools", to see hardware and software tools, as well as things you've tagged "gardening tools" and "car tools".


How?

There are three ways to create tag intersections:

  1. Manually type the tags into the address bar of your browser, e.g.  http://del.icio.us/tag/A+B
  2. Manually type A+B into the breadcrumbs shortcuts on any del.icio.us page.
  3. "Build" them in the del.icio.us interface (which is very powerful, and underrated) by adding related tags:
    • Look on the right side of your del.icio.us page, to see a list of your tags, which you can display as a list or a cloud.  (I recommend a cloud if you have a large number of tags, though list view is useful for seeing the number of items associated with each tag, which helps in this case.)
    • Click on the first tag you want to use to build your intersection; in this example, we'll use "learning".  (The order is not important, so "learning+reference" is the same as "reference+learning", but order can help tag intersections make sense to humans.)
    • Look at the list of related tags that appears next to your list and click on the "+" beside the next tag you want to add to the intersection.  (This list appears only if your first tag contains at least one bookmark that has at least one other tag.):
Example: Building tag intersections

    • You can narrow your filter by adding more tags to the intersection, or broaden it by removing tags:
Example: Building tag intersections 02

Tricks

  • If you frequently use a tag intersection, create a saved search - Try entering your intersection, then tagging the del.icio.us page that displays the results of the tag intersection filter.  (Tagging del.icio.us pages is an idea with a lot of potential, about which I plan to write soon.)  See myTagsets for examples.
Note that many of these concepts apply -- perhaps with some variations -- to any service/software that supports tag intersections.  Flickr is one such service, and there seems to be some discussion on the topic in the Flickr forums.

November 25, 2005

Summary: Taking digital photos through an airplane, car, or building window often produces relatively poor results.  Auto Contrast is a quick and easy way to really improve digital photos you might otherwise not have considered worth keeping or sharing.

Ania and I recently went to Europe and we took several pictures through the window of the airplane.  We didn't expect much, since they were taken through a multi-pane window, but there were some shots we wanted to capture nonetheless.  As expected, they didn't turn out too great.  Later, while processing the pictures with Picasa, I decided to see what the "Auto Contrast" button would do.

It turns out, that single basic fix changed many of our pictures -- some through plane and car windows, others not -- from blah and faded to quite presentable!  Look at the difference between these two photos:

   Top: Original image
Bottom: Same image with Auto Contrast applied


I'm sure most photo editing tools have this functionality, but I can't speak for the results other tools' Auto Contrast fix may produce.  I really like Picasa (another free tool from Google), so it's the example I'm using.  To use Auto Contrast in Picasa, just double-click on the picture, and choose it from the "Basic Fixes" tab on upper left:

You may or may not like the way this fix changes a given photo, but it's worth trying it on more than you might think; it often makes a nice improvement.  I'm sure some photography "purists" will say this changes the image too much, or in the wrong way, but they probably don't run into the problem of poor contrast much anyway!  In my experience, Auto Contrast -- at least as implemented in Picasa -- usually improves the photo, especially if it was taken through a window.

One major benefit of using Picasa; Auto Contrast and other photo modifications (even cropping) are implemented as filter layers which can be applied and removed any time (as long as you're using Picasa).  This means you can try several changes at once and undo as much as you want without having to worry about the original, which Picasa preserves intact.  Nicely done, Picasa developers!

November 11, 2005

My dad brought me up to be a gentleman, and one of the things that includes -- if you share a bathroom with women -- is putting the toilet seat down after using it.

Bemis has made it easier to be courteous with their Slow-Close toilet seats, which lowers either or both the seat and the lid slowly and silently after you give them a nudge.  You just start the seat closing, let go, and you're done.


We just moved into a new (to us) house, and we replaced the former owners' toilet seats with these right away.  The convenience of being able to put down the toilet seat with so little effort almost certainly violates some chivalric code of required difficulty and sacrifice, but this is one of those small advances in modern engineering that deserves to become ubiquitous.  If you have a reason to get new toilet seats, these are definitely worth consideration.

As a bonus, the seat also has quick-release snap hinges, so you can easily remove the entire seat for thorough cleaning.

October 29, 2005

Problem


I'm very happy with my blog hosting service, but I don't care for the online post editor they provide.  It's a small, cramped window, doesn't even have a button for bulleted lists (a basic formatting element!), and is really slow to save changes (I'm getting spoiled by all these web apps that use AJAX!). 

I know there are several standalone blog post editors out there, but I don't need a lot of bells and whistles, and I'd rather not have yet another piece of software to manage.

Solution


I really like using Gmail to compose email, I've long been using it as my "thought pad" to write down quick ideas, so it was a natural next step to start using it to write blog posts too.


Gmail is a nice solution to my problem because it:

  • has a good rich-text editor (with bulleted lists!)  whose output pastes into my blog host's editor with no problems
  • auto-saves drafts, a great new feature
  • provides a large editing window
  • is fast - keyboard shortcuts!
  • is lightweight - I don't have to install any new software or wait for an application to load
  • is familiar - I use it for email
  • has spell-check, which I don't use much, but could come in handy
Yet another reason I'm happy to have switched to Gmail!


Update: 2006.01.13

I was happy to notice that the post editor has been released from "absolute size jail", and now scales in width according to the width (though not height) of the browser window!  I still prefer Gmail's rich-text editor for various other reasons, but this is certainly a step in the right direction!

Sidenote

I've been disappointed to see so much absolute sizing on the web in general and blog templates specifically; why not enable the reader to determine the best page dimensions?  This also has the benefit of improving usability among various devices.

Update: 2006.01.20

John, who works for BlogHarbor.com, emailed me: 


James,

I saw your post here:

 http://jameselee.blogharbor.com/blog/_archives/2005/11/25/1421679.html

where you talked about the posting editor... I have an option for you...
Check out this post:

 http://forums.blogharbor.com/viewtopic.php?p=4502#4502

where I talked about a Firefox extension called "Xinha Here!" which you
might find more to your liking. I see you're a Firefox user already, so
this might be an extension you find useful.

Hope this helps,

John Keegan


As I said in my reply to John, I think it's cool that BlogHarbor support staff bothers to become informed about customer's comments, and does so using the technology they support!


Update: 2006.02.04 

John, who works at BlogHarbor.com, wrote: 

Did you know that you can post to your weblog by email? Use your favorite gmail editor to compost your articles, click send, and they will appear on your blog. Learn more about BlogHarbor's moblogging support.

May 06, 2005

What? 

Notes iconTaking notes improves your ability to focus on interactions and ideas, reinforcing your engagement and comprehension.  Take notes to increase your productivity when planning and managing tasks & projects, having "administrative" conversations.


"Administrative" conversations are those you have when you're managing daily administrative tasks and chores, like scheduling appointments, planning vacations,  reporting an insurance claim, calling to change your mobile phone plan, etc.


Benefits

Notes are useful while you're taking them as well as for future reference

The value of taking notes is often realized after you've taken them, but even the act of taking them has several "real-time" benefits.  Notes help you:

  • clarify and structure your thoughts & actions
  • keep track of what's happening
  • reference what has happened
  • plan what needs to happen next
  • keep an accurate record of ideas, facts, and information
  • reinforce your understanding of information
  • improve your access to information

...etc.


The more you take notes, the more you'll benefit from doing so

I take notes all the time; for example, when:

  • talking to my tax guy
  • researching something I want to buy
  • setting up & scheduling my mom's Mother's Day spa treatment
  • changing my insurance deductible
  • calling to report a cable problem
  • planning a project at work
  • listening to my mortgage guy explain the details of our refinance
  • solving a problem, so I don't have to hope I can remember the solution if it recurs

You don't have to wait until you have a "project" or a meeting to take notes; they're valueable even for minor tasks.


You'll always know where you put the information

Think of all the times you get a confirmation number for something; if you're already taking notes, you are ready to write it down as soon as they give it to you, and you always know it'll be in your notes, as opposed to on some random scrap of paper or one of the 47 cloned Post-It notes around your desk.
 

Make your interactions more efficient

I often start a notes file before I begin a task or interact with someone, so I can plan what I want to do and prepare what I want to say.  If I'm calling someone and I have several questions or issues to discuss, writing them down in advance, frees me from having to keep everything in my head while I listen.  I try to summarize & write just facts while listening, then expand later with my commentary/thoughts if necessary.  That way, I can just move on to the next issue or question without pausing to try to remember it under time pressure.  This is a very nice way to work, and I recommend you try it out.


Save information in a more reliable place than in your head 

I try to take advantage of downtime at work to write down my thoughts.  Chances are, I'm thinking about things I need to get done anyway, so I might as well record those thoughts so I can start figuring out how to do the things rather than what I need to do.  I almost always find that the result of doing this is a great sense of relaxation. David Allen talks about this idea (getting stuff out of your head) in more detail in his book, Getting Things Done.

No more wasting time refreshing everyone on details 

Have you ever forgotten the details you agreed on with someone while planning something with multiple phases?  Taking notes while you plan (or preparing them beforehand) relieves you of having to try to remember the details, which is often not the best use of your mind.  That's why they invented writing!  Sure, it's usually not a big deal, but you can be much more efficient in your interactions if each conversation doesn't have to begin with "Can you  refresh my memory and go over your recommendations on implementing the third phase again?"

Sometimes having a record of the details can give you the advantage; many people don't have a precise record -- especially from memory --  and when there's a dispute, it's hard to argue against someone who took notes.

My approach and implementation

Some of my thoughts & tips on taking and managing notes

  • Consider using plain text - There are many systems and software packages out there, and I don't want to start a religious war, but at least consider the value of plain text files.  I've never had to convert from plain text, and I can use plain text files on any platform/device/interface; it is truly portable.  (That said, HTML & XML are technically plain text, but I digress...)  Sending an email message to yourself is effectively plain text too, though I have other reasons why not to use email for that, which I'll discuss another time.  If email works for you, use it!  As David Allen says, (I'm paraphrasing) have as many systems as you must, and no more.
  • Use a standard header - Notice that email messages have a "header" section that includes information about the message.  This has several benefits, and they apply just as well to notes.  Consistency  and standardization will almost always serve you well.

    EXAMPLE 01 - Header information ("metadata")

        SUBJECT: Refinance 2005
           TAGS: home, house, mortgage, refinance, money, credit
         STATUS: OPEN
    NEXT ACTION: Call to get a status update
        CONTACT: Joe @ Mortgage Broker Co. 800-555-1212
           DATE: 09:00 2005.04.01

  • Add your own tags - Tags are very useful for organizing and finding information.  You can add your own tags to most documents and start realizing the benefits immediately, such as the ability to create relationships between your various sources of information.  See the example of tags above; I don't have to remember where I filed my notes on the refinance -- I can search for it using various related words, and several of the words I think of will lead me to the notes file, as well as all the other files that have the tags.  You can  experiment with using multiple tags to develop different levels of tag intersections.  (I'm sure that soon goes down the path of data search theory...)
  • Sidenote: I'm going to add this point about creating relationships to my article on adding your own tags to your documents; the idea had not yet occurred to me at the time I wrote that article.  This is one of the things I love about blogging; it helps me refine my thinking and consolidate the information and knowledge in my head.  I guess I could say blogging is like taking notes on my thoughts!
  • Add a "STATUS" tag to your header - This lets you search by status (e.g. find all "open" or "closed" issues)
  • Add a "NEXT ACTION" tag to your header - David Allen's "Getting Things Done" method emphasizes thinking about your tasks in terms of what is the next action you need take.  Including this tag in the header section (and in the body, as needed) of your notes lets you search for all next actions, and enables you to scan just the header of your notes and know what you need to do.  (Added: 2005.06.28)
  • Use a standard file naming convention - Use whatever convention works for you, but consistency is key, especially for searching (e.g. "notes * 2004" to find all my notes from last year). 
    • I recommend you include the date at the end of the file name; depending on the type of notes, it may be better to use only the year, or to use the full date (use YYYY.MM.DD, and it will sort nicely on your computer).  Putting the date at the end lets you use the beginning of the file name for sorting by Name; if you have several files with the same beginning but different dates, you can sort them by Name and you'll get automatic date sorting for free.  I begin the file name with "NOTES" because I put notes files in various folders, and want to be able to find the files easily, even just by looking at the names.
    • The convention I'm using now is:

      EXAMPLE 02 - My notes file naming convention

      NOTES - Refinance - 2005.txt
      NOTES - Cingular - 2005.txt
      NOTES - Exploratorium Outing & Picnic - 2004.08.24.txt


  • Use one file per vendor, not one per issue with each vendor  - This way, you know that everything related to a vendor (e.g. Cingular), whether it's changing service plans or resolving problems, is in one place. (Credit goes to Ania for this idea.)

  • Put the most current info at the top - I keep my notes in "reverse chronological order".  This is useful because the most current (and often most relevant) information is at the top, and I don't have to "move" very far to get it or start adding new info.  I'm curious to know whether anyone has a good argument for putting newest at the bottom.  If you do, leave a comment!

  • Add a timestamp to each entry - Sometimes, the when is just as important as the what, or more so.  Timestamping -- which should always include the date -- is incredibly valuable, and you should do it even when you do jot something down on a Post-It.  Timestamps increase the richness of information, and help you search.  Again, consistency is key,so use a standard format & location/structure for your timestamps!

    EXAMPLE 03 - Timestamps & consistency


    16:20 2004.04.20
    ============================================================
    + This is another sample entry

    13:15 2004.04.19
    ============================================================
    + This is a sample entry in my notes file


    • I use plain old Notepad (on Windows) to take notes.  One nice feature of Notepad is that the "F5" key will insert the current date and time.  (I know, I know, there are all kinds of other, better tools.  I'll get around to finding one I like, but for now, Notepad is everywhere, free, and really fast.)
    • Note that the timestamps in the example above are in the format, HH:MM YYYY.MM.DD HH:MM.  I generally believe it's best to go left to right, from most significant (year) to least (minute), but  Notepad insists on inserting the timestamp using the format above.  The more I use it, the more I don't mind, since in practice, the most significant info is often the time, if I make multiple entries in a single day.  So maybe it's not so bad.  In any case, using F5 is extremely convenient, so I'll live with it.

More thoughts & ideas

Search your notes for more than just words & phrases

  • Use a search tool - Modern search tools (e.g. "desktop search" tools from Copernic, [my favorite] Yahoo, and Google) let you apply custom, dynamic filters to your information.   Whichever you prefer, a search tool can be extremely powerful.
  • Don't limit searching to the idea of finding a document or phrase - Think of your search tool as a way to apply filters to your data, or see information through different "lenses".  This enables you to identify and make use of patterns and groupings (e.g. find all notes with "STATUS: OPEN").


Managing & archiving notes files

  • Keep only what you currently need right at hand - You probably don't need to frequently refer to notes about something you dealt with in 2003.  Consider creating an "Archive" folder.  The ideal solution would be if we could have something like Picasa's date range selection slider in file system browsers:
SCREENSHOT - Picasa date range selector 


Future additions

  • Structuring & formatting entries
    • Consistency
    • Simplicity
  • Paper's okay, but digital has compelling advantages
    • No holy war please!  I know some people love papger, and it has its uses, but I want to present some facts for consideration.

Adding STATUS tags to your notes allows you to search for everything that matches a given status. 

I keep notes on almost every task/project/etc. that I'm managing, whether it's changing my mobile phone plan, figuring out what we're doing for Mother's Day, or refinancing our mortgage.

I currently use "OPEN", "HOLD", "TODO", and "CLOSED", but the great thing about tags is they aren't static; you can use whatever tags make sense and are useful to you, and change them as you see fit.

Use multiple status tags - (Added: 2005.05.09) Note that you can use  more than one status tag, for example, not all "OPEN" issues are necessarily "TODOs", but some are.  In those cases, just add "STATUS: OPEN, TODO", and your search tool should find the notes whether your search for "STATUS: OPEN" or "STATUS: TODO".
 
EXAMPLE 01


SUBJECT: Refinance 2005
   TAGS: home, house, mortgage, refinance, money, credit
 STATUS: OPEN
CONTACT: Joe @ Mortgage Broker Co. 800-555-1212
   DATE: 09:00 2005.04.01


When I search for "STATUS: OPEN", I get a list of all my notes on unresolved tasks and projects, which is another approach to the idea of having a task list.  This way, I can easily review & prioritize what I want to work on next, with all the related notes right at hand, a click away. 

April 05, 2005

I'm in the process of evangelizing blogs & feeds to my friends and family, and just saw Michael Hyatt's post, How to Read Blogs on his blog, Working Smart (one of the first productivity-related blogs I found).

The article Michael references provides a good introduction to reading blogs. Although I could link directly to the article, Michael already wrote a nice introduction, and should get the credit for the reference. Plus, his blog is worth a look, so I've linked to his intro rather than the actual article.

Feed readers -- the tool of choice for reading blogs -- are important technology and will dramatically improve our ability to manage information more efficiently. As the referenced article's author says, it's tough to convince people of why they should read blogs. I think, though, that we can at least help them do so efficiently, and the benefit of feed readers is that they are useful for any syndicated content (e.g. AP news), not just blog content per se. So, even people who aren't "into blogging" can get value from feed readers.

April 01, 2005

I tend to be pretty paranoid (well, I'd say "prudent") about problems when using a computer, (though I rarely have any), so I am a bit of a fanatic about saving what I'm doing, sometimes to the annoyance of anyone using a computer while I'm present.

The rule of thumb I use is, save your work every time you don't want to go back and re-create what you've just done. In fact, saving is so easy, there's no reason not to do it constantly, whether it's a document, email, or blog article.

Save button

I was just editing a blog article, and had put a fair amount of time into it, so I thought, "I should probably save a copy". Not 2 minutes after doing so, something else I was doing on my computer caused it to crash. I would have been pretty frustrated by this, but having just recently saved, I only lost a sentence or two.

I think this is a great example of why my "saving fanaticism" is justified, so it seemed worth taking a moment to stop and remind everyone: Save your work often! It's quick & easy, and though you may only rarely benefit from it, you'll be very happy those few times you do.

February 25, 2005

I was getting tired of trying to figure out a good way to keep track of the cool stuff I've been finding online (more and more in blogs these days), so I did a little research and found Bloglines, which showed me the value of using a feed reader, something I didn't realize I needed until I tried it.

One of the main reasons I started using Bloglines is because of their "Clip Blog" and "Clippings" features, which allow you to save blog entries you read via Bloglines to either your own Clip Blog (which you can make public to share with others) or your private "Clippings" folder.

Update: 2005.06.10

Goodbye Clip Blog, hello Furl - I've completely abandoned my Bloglines clip blog in favor of Furl, a service that does a lot more than Bloglines' clip blog, and is a much better tool for keeping track of anything (not just blog entries you read in Bloglines) you find on the web.

Update: 2006.02.02

Switched from Furl to del.icio.us for most things.

There may be others and/or better feed readers out there, but none has yet jumped out at me.  I think Bloglines could/should be stronger in the blogging department, (I have yet to figure out, for example, if I can have another Bloglines blog aside from my Clip Blog, but I've just begun learning about all this) but I'm not sure that's their focus.  They seem to be one of a small number of web-based aggregators who see the value in providing some blogging service (specifically Clip Blogging) together with aggregation.

Now you can keep track of the stuff I find online at your discretion, and without me having to constantly send you email.  It's one of the great things about the "publish and subscribe" paradigm!

Update: 2005.05.08

I inserted this section months later, after having written it as part of an article about using Bloglines to track packages.  I think it belongs here, because I didn't really cover the other uses for Bloglines before, as I'd just begun to understand all this.

Feed readers are not just for blogging!

Many people think Bloglines and other feed readers are just tools for people who are "into blogging". They are indeed a great way to keep up with constantly-changing information, such as blogs, but they're useful for much more than that. We'll soon start to see more benefits of feed readers, because RSS -- and "web feeds" in general -- are very versitile and powerful technologies/ideas. We're just starting to see innovations in how feeds can be used (for example, to keep up to date on the status of a package).

RSS newspaper icon
Feed technology is used for syndicating much of the news information on the Internet right now. News agencies & web sites have known about the advantages of syndication for a long time - think AP. But they're using syndication so their servers can exchange news information; Feed readers allow people to start realizing the benefits of syndication for all kinds of content. For example, all this incoming information generated by syndication soon leads to a need for more efficient ways to manage it, which leads to the use of feed readers to bringing it all together in one place.

To see if a web site you read provides a feed, look for the words like "Site Feed", "Atom", "RSS", or "XML" often in small orange buttons, like this: RSS icon ATOM icon XML icon. Update: A new movement has has been started to standardize on a universal feed icon that looks like this: Feed icon

Hopefully, this gives you a sense of why you'd want to use a feed reader. Most (like Bloglines) are free, and it's easy to get started!